Appearance
How to set up a DNS server on Ubuntu Server
This guide will use Bind9 as the DNS server software.
Software used in this guide
- Nala - A faster frontend for APT
- Bind9 - DNS server software
- Nano - A command line text editor
Replacement values
- Replace
[INITIALS]with your initials. - Replace
[SURNAME]with your surname. - Replace
[HOSTNAME]with the output of thehostname -fcommand.
Install requirements
Network adapter settings
Ensure that your ubuntu server virtual machine is running on one network adapter in NAT mode. 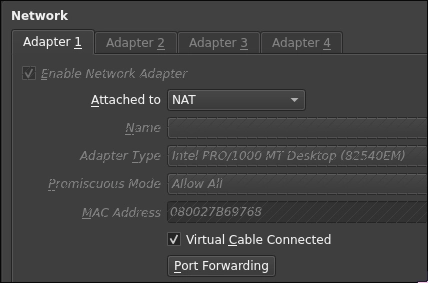
- Install nala (optional)
bash
apt install nala- Install Bind9 and its utilities
bash
nala install bind9 bind9utilsConfiguring the network
Network adapter settings
Ensure that your ubuntu server virtual machine is running on one network adapter in internal-network mode, with the promiscuous mode set to Allow All. 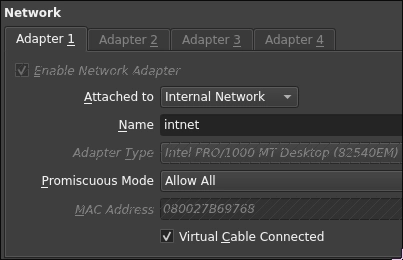
- Configure a static IP address for your server.
bash
sudo ip addr add 10.80.80.1/24 dev enp0s3
sudo ip link set enp0s3 up- Verify the IP address
bash
ip aYou should see the IP address 10.80.80.1 assigned to the enp0s3 adapter.
- Edit the hosts file, run
sudo nano /etc/hosts, then change the first two lines to:
plaintext
127.0.0.1       localhost
127.0.0.1 [HOSTNAME].[SURNAME].local [HOSTNAME]- Stop the systemd-resolved service to prevent conflicts with Bind9.
bash
sudo systemctl stop systemd-resolved
sudo systemctl disable systemd-resolved- Edit the resolv.conf file to use the local DNS server. Run
sudo nano /etc/resolv.conf, remove everything from the file and add:
plaintext
nameserver 127.0.0.1
search [SURNAME].local
Configuring Bind9
- Edit the name configuration file. Run
sudo nano /etc/bind/named.conf.options, erase everything in the file and add:
plaintext
options {
        directory "/var/cache/bind";
        forwarders {
                10.1.1.30;
        };
        dnssec-validation auto;
        listen-on { any; };
};- Create a new zone configuration file. Run
sudo nano /etc/bind/named.conf.local, erase everything in the file and add:
plaintext
zone "[SURNAME].local" IN {
        type master;
        file "/etc/bind/zones/db.[SURNAME].local";
};
zone "80.80.10.in-addr.arpa" {
        type master;
        file "/etc/bind/zones/db.10.80.80";
};- Create the IP databases
- Run
sudo nano /etc/bind/db.[SURNAME].localand add:
plaintext$TTL 604800 @ IN SOA [HOSTNAME].[SURNAME].local. root.[SURNAME].local. ( 2 ; Serial 604800 ; Refresh 86400 ; Retry 2419200 ; Expire 604800 ) ; Negative Cache TTL ; @ IN NS [HOSTNAME].[SURNAME].local. [HOSTNAME] IN A 10.80.80.1- Run
sudo nano /etc/bind/db.10.80.80and add:
plaintext$TTL 604800 @ IN SOA [SURNAME].local. root.[SURNAME].local. ( 1 ; Serial 604800 ; Refresh 86400 ; Retry 2419200 ; Expire 604800 ) ; Negative Cache TTL ; @ IN NS [HOSTNAME].[SURNAME].local. 10.80.80.1 IN PTR [HOSTNAME].[SURNAME].local. - Run
Check the configuration locally
- Check the Bind9 configuration for errors
bash
sudo named-checkconfIf there are no errors, the command will return nothing. 2. Check the zone files for errors
bash
sudo named-checkzone [SURNAME].local /etc/bind/db.[SURNAME].local
sudo named-checkzone 80.80.10.in-addr.arpa /etc/bind/db.10.80.80
If there are no errors, the command will return something like:
plaintext
zone [SURNAME].local/IN: loaded serial 2
OK
zone 80.80.10.in-addr.arpa/IN: loaded serial 2
OK- Restart Bind9 to apply the changes
bash
sudo systemctl restart bind9- Check the status of Bind9 to ensure it is running
bash
sudo systemctl status bind9You should see active (running) in green text.
Testing the DNS server
- Ubuntu server
- Test the DNS server using
dig
bashdig [HOSTNAME].[SURNAME].local - Test the DNS server using
- Windows client
- Go to the network adapter settings in virtualbox settings for the machine, make sure there is only ONE adapter set to internal network, with the promiscuous mode set to Allow All.
- After that is done, power on the machine, open the control panel, go to Network and Internet > Network and Sharing Center > Change adapter settings, right click on the network adapter and select properties. Select
Internet Protocol Version 4 (TCP/IPv4)and click properties. Set the preferred DNS server to10.80.80.1. - Open a command prompt and run:
bashnslookup [HOSTNAME].[SURNAME].local - Go to the network adapter settings in virtualbox settings for the machine, make sure there is only ONE adapter set to internal network, with the promiscuous mode set to Allow All.
Done! You have successfully set up a DNS server on Ubuntu Server using Bind9.